Watch the video tutorial above on how to setup your recipient list.
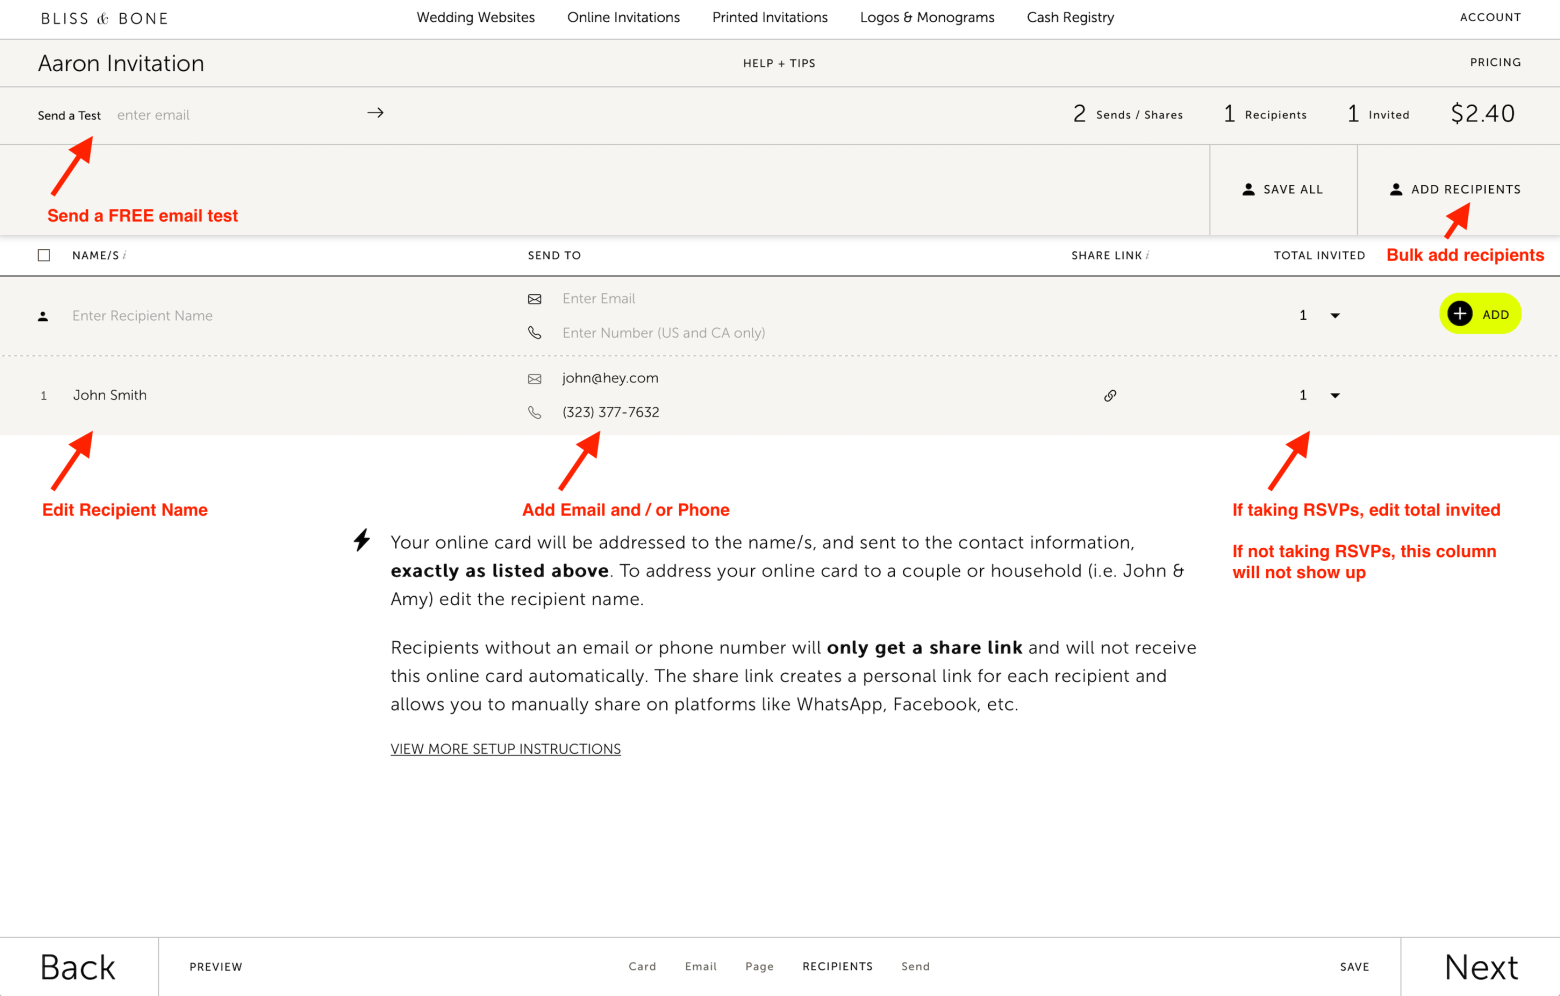
When you get to the Recipient step of the online card builder, this is the step where you specify the names and email or phone number of who will be receiving your online card or announcement. Please note that the names you input on your recipient list is exactly how the names will show on the email when your guests receive their email.
You can fill out your recipient list in one of two ways:
1. Type in the name and email directly and add them to your list one-by-one (add to the list by using the big "+" sign).
2. Select the Add Recipients button and all your contacts with emails will pop open in a drawer. Select the guests in your Contacts that you would like to receive your online card or announcement and click "Add Guests". Please note that only the guests that have emails will show up, as this is a platform that sends via email.
If you would like to send an email to a couple, family, or group, you can edit the name right on the recipient list directly. So, if your contact says "John Smith” (because you only have John's email), but you want the email to be addressed to “John, Amy and Family”, then add John Smith to your recipient list (with his email) and edit the name right there. Hover on John Smith’s name you’ll see the field show up that will allow you to edit and save right on the recipient list. When you do that, your email and event page will say "to....John, Amy and Family".
Also, if you are taking RSVPs via your Online Card, you'll want to indicate the "Total Invited" for "John, Amy and Family". So, if John has a family of 4, increase his total invited to 4 and SAVE. When you do that, John will be able to RSVP for up to 4 people.
Taking RSVPs through your Online Card: If you are taking RSVPs via your Online Card, you'll want to indicate the "Total Invited" for John and his Family. So, if John has a family of 4, increase his total invited to 4 and SAVE. When you do that, John will be able to RSVP for up to 4 people.
Taking RSVPs through your Wedding Website: If you are instead taking RSVPs via your Wedding Website, then the "Total Invited" column will not show up. Since your guests are going to be RSVPing on your Wedding Website - which is a separate product - that "total invited" column isn't relevant. You will simply be using your Online Card to link to your Wedding Website.

You can send online cards via email or text / SMS. Please note that you can only send to phone numbers in the US or Canada.
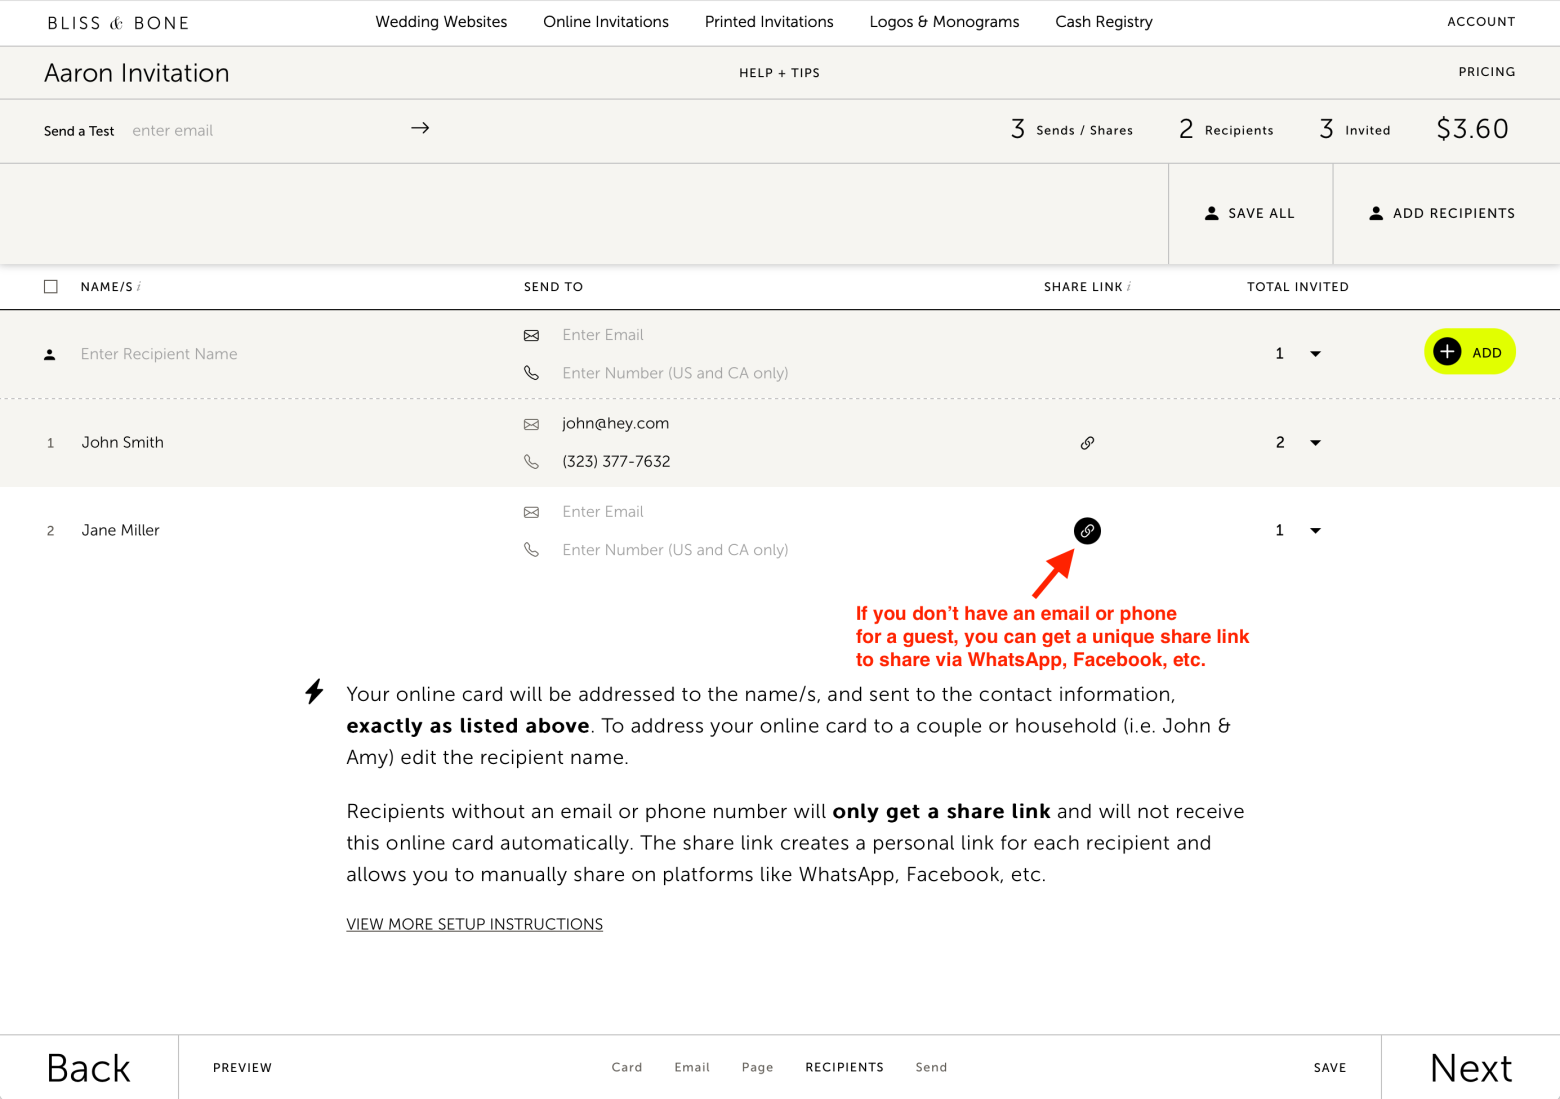
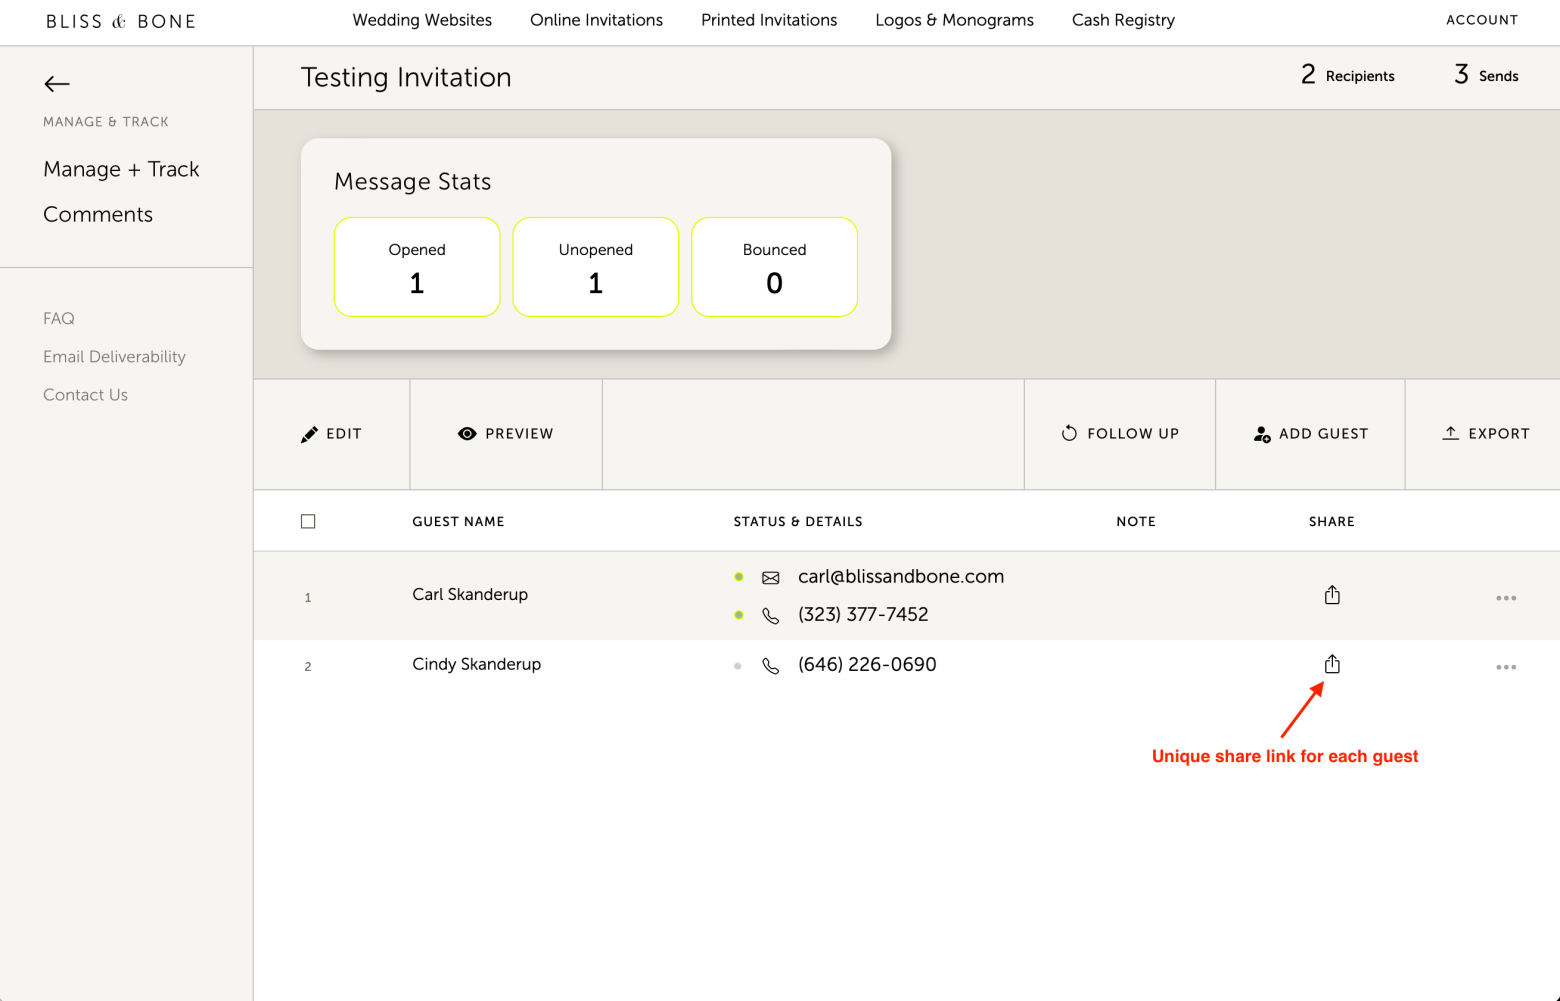
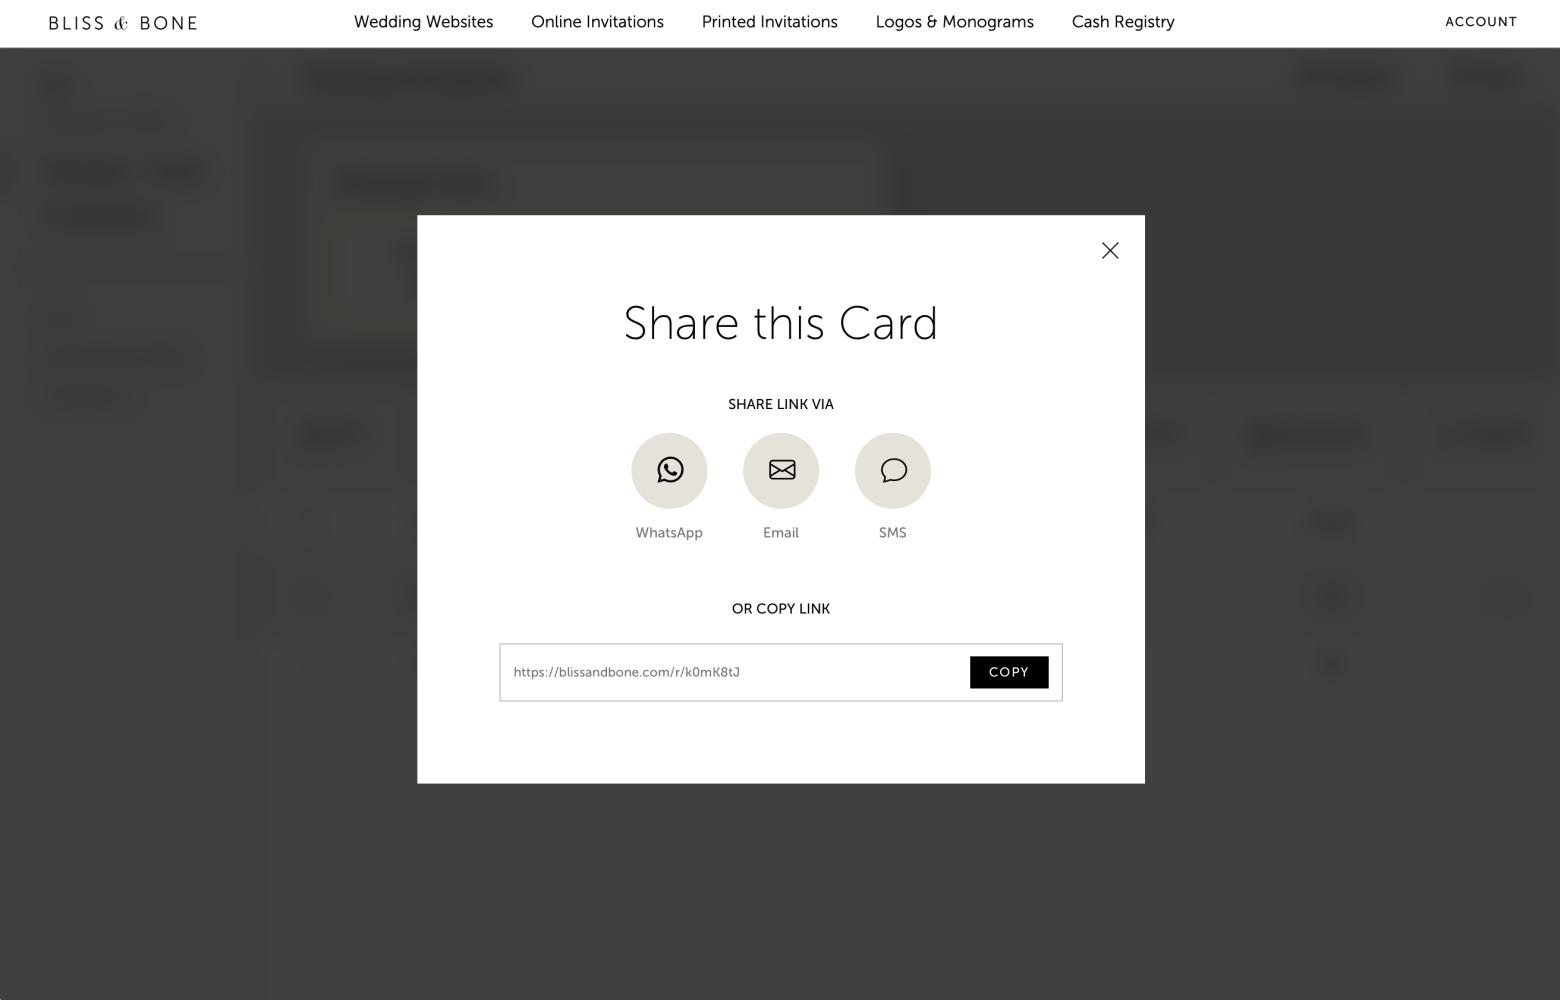
If you don't have an email or phone number for a guest, or you'd like to share with an international guest via WhatsApp, you can still add them to your recipient list and get a unique share link. Once you pay for that unique share link, it will be availabe in your "manage & track" to manually share with your guest(s). See the screenshots below!


You can edit any name or email right on the recipient list directly by hovering over the field you want to edit. So, hover, click, type right in that field and SAVE.
If you would like to send an email to a couple, family, or group, you can edit the name right on the recipient list directly. So, if your contact says "John Smith” (because you only have John's email), but you want the email to be addressed to “John, Amy and Family”, then add John Smith to your recipient list (with his email) and edit the name right there. Hover on John Smith’s name you’ll see the field show up that will allow you to edit and save right on the recipient list. When you do that, your email and event page will say "to....John, Amy and Family".
Watch the video tutorial above on how to setup your recipient list, or send an email to a couple or family.
If you would like to send an email to a couple, family, or group, you can edit the name right on the recipient list directly. So, if your contact says "John Smith” (because you only have John's email), but you want the email to be addressed to “John, Amy and Family”, then add John Smith to your recipient list (with his email) and edit the name right there. Hover on John Smith’s name you’ll see the field show up that will allow you to edit and save right on the recipient list. When you do that, your email and event page will say "to....John, Amy and Family".
If you are taking RSVPs via your online card, then you will see a Total Invited colum that allows you to set a max RSVP number for that recipient. So, if "John & Jane Smith" are a party of 2, and you want them to RSVP for up to 2 people, set the "total invited" to 2.
Please note that if you are not taking RSVPs via your online card, that Total Invited column will not show up. For example, if you are using your online card to link to a wedding website or somewhere else to take RSVPs, that total invited column will not show up, as it's not connected in any way to your wedding website.
Watch the video tutorial above on how to setup your recipient list, and the difference between your Contacts and the Recipient list.
Your Contacts (My Account > My Contacts) is the hub to store your main contact list, and it functions like any other contact list in your digital life, like on your phone or computer - organized by individuals. You typically don't have contacts in your phone for "John, Amy and Family" - you have "John Smith" as his own contact, and "Amy Smith" as her own contact.
Also, your B&B contact list allows you to group families together in a "Household", but that's all Householding is - grouping people together for the purposes of organization. For weddings and events, people tend to think about their contact list in Households, so we simply allow (recommend) you to group people together that way.
When you go to send an Online Card, our system will only show contacts with emails from your Contact list. The system doesn't automatically add all household member names to the one email. That would actually cause a lot of issues! Many people send Online Cards for private events, and if the system automatically added all family member names, it may not be true that everyone is invited to that private event.
TO SUMMARIZE: If you want to address an email with a Household name like "John, Amy & Family", then you simply need to edit and type that in on your recipient list. This is exactly how it would work if you were sending printed wedding invitations!
If you were sending physical inviations and you wanted all household names on your envelopes, you would have to create a separate list with all those household names so your envelopes could be printed or calligraphed with those names.
Finally, if you plan to use a wedding website, we highly recommend your main Contact list is setup by individuals and organized by households. If your guests are going to RSVP on your wedding website, you'll want individualized RSVP data (meal selections, transportation quetsions, etc.), and setting up your Contacts as individuals will make that possible.
Also, if you turn on the wedding website login requirement, you may ask your guests to log into your site with their name - and that individual name will need to match whatever you have in your Contacts. Guests will have a hard time logging in as "John & Amy Smith", but will have no issues logging in with their own name - "John Smith".